


For UV measurements (below 350 nm): Use quartz. For visible-only (above 400 nm): Use glass (5–10× cheaper). Sample <500 µL: Use micro/sub-micro cuvettes. Path length: 10 mm is standard; shorter for concentrated (A>1), longer for dilute (A<0.1) samples.
👉 Quick decision: Below 350 nm = quartz, mandatory. Anything else = compatibility table below.
|
474
Instrument models
|
2,137
SKUs in stock
|
190 nm
Quartz UV limit
|
25 FAQ
Lab-verified answers
|
Validated against ISO 21348 spectral definitions and USP <851> pharmaceutical QC requirements.
|
✓
|
Expert-Reviewed · Lab-Verified
By the Cuvet.Co Editorial Team · Reviewed against ISO 21348, ASTM E275, USP <851> · Trusted by Johns Hopkins, U. of Toronto, NUS Singapore
|
|
Selecting the Right Cuvette: A Comprehensive Guide to Types, Materials, and Usage
Cuvettes are small, rectangular vessels designed to hold liquid samples for spectroscopic analysis. They feature clear optical windows, allowing light to pass through the sample and enabling precise measurements of the liquid’s properties [1].


These instruments are critical in a range of analytical techniques, such as UV-Vis spectrophotometry, fluorescence spectroscopy, and others that require accurate optical measurements.
This guide offers a detailed overview of cuvette types, materials, sizes, and best practices. It aims to help laboratory technicians and researchers choose the right cuvette for their specific needs and ensure optimal results in their experiments.
About This Guide
This comprehensive resource covers:
- Cuvette types and materials
- Standard sizes and specifications
- Best practices for selection and usage

Designed for laboratory technicians and researchers, this guide will help you choose and use the optimal cuvette for your specific analytical needs.
- About This Guide
- What Are Cuvettes Used For?
- Cuvette Materials and Optical Properties
- Common Cuvette Sizes and Sample Volume Types
- Path Length and Its Importance
- Choosing the Right Cuvette: Key Considerations
- Instrument Compatibility and Cuvette Dimensions
- Cuvette Handling, Cleaning, and Maintenance
- Cuvette Accessories and Customization Options
- Quick Reference: Best Cuvette Choices for Common Scenarios
- Frequently Asked Questions (FAQs)
What Are Cuvettes Used For?
Cuvettes are small containers used to hold liquid samples for optical analysis. They allow for the measurement of how much light is absorbed or transmitted at specific wavelengths, which can provide crucial information about the sample’s concentration, purity, reaction progress, and more.
Common Applications:
- UV-Vis Absorbance Measurements 🧬:
- Purpose: Quantifying DNA/RNA (260 nm), proteins (280 nm or colorimetric assays), enzyme kinetics, and chemical concentrations by measuring absorbance in a spectrophotometer.
- Typical Use: Measuring absorbance to determine concentration or purity.
- Fluorescence Measurements ✨:
- Purpose: Observing fluorescence emission of samples (e.g., GFP, fluorescent dyes).
- How it Works: The sample is illuminated with excitation light, and the emitted light is measured at a 90° angle through clear cuvette walls.
- Infrared (IR) Spectroscopy :
- Purpose: Analyzing molecular vibrations in a solution.
- Special Note: Specialized IR cuvettes or cells are used for the mid-IR range.


In all these applications, cuvettes hold the sample in a fixed geometry, ensuring that a defined path length of the sample is irradiated by the light beam of the instrument.
Cuvette Design :
- Standard Cuvette Shape: Typically, cuvettes have a square cross-section with outer dimensions of approximately 12.5 × 12.5 mm, which fits into standard spectrometer holders [1].
- Design Features:
- Two transparent sides for light to pass through.
- Two frosted or opaque sides for handling and labeling.
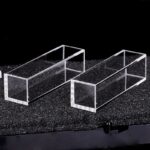
- Fluorescence and Scattering Applications: Cuvettes with four clear windows are used so that light can be measured from the side as well [2].
Why Use a Cuvette?
- Consistent Optical Path : Cuvettes provide a consistent optical path, typically 1 cm, ensuring reproducible measurements.
- Minimized Contamination and Evaporation 🚫: Using a cuvette helps reduce contamination and evaporation during measurements, preserving the sample integrity.
- Versatility : Cuvettes can accommodate a wide range of sample volumes, from just a few microliters in specialized micro cells to tens of milliliters in larger cells, making them suitable for both dilute and concentrated samples [1].

Conclusion:
Cuvettes are a critical interface between your sample and the spectroscopic instrument. Choosing the right cuvette is essential for obtaining accurate and reliable data, ensuring the best results from your analysis.
Cuvette Materials and Optical Properties
Selecting the right cuvette material is crucial for accurate spectroscopic measurements. The material determines the cuvette’s transparency across different wavelengths, its durability, chemical resistance, and overall cost. A cuvette must be transparent at the wavelengths used in your experiment—otherwise, it will absorb light and interfere with your results [2].
Key Cuvette Materials:

- Optical Glass 🏮:
- Wavelength Range: Best for the visible and near-infrared (NIR) ranges (~340 nm to 2,500 nm) [2].
- Pros: Affordable, reusable, and provides good optical clarity in the visible/NIR range.
- Cons: Not suitable for UV measurements below ~340 nm due to strong UV absorption.
- Use Cases: Ideal for colorimetric assays, optical density (OD) measurements in cell cultures, and other visible light applications. Tip: Glass cuvettes are a great choice for visible-light work but not for UV measurements, such as DNA quantification (260 nm) [3].
- UV-Grade Quartz (Fused Silica) :
- Wavelength Range: Covers the full UV, visible, and NIR spectrum (~190 nm to 2,500 nm) [2].
- Pros: Highly transparent in the UV (up to ~83% transmission at 220 nm), excellent chemical and heat resistance, and minimal autofluorescence.
- Cons: More expensive than glass and fragile if dropped.
- Use Cases: Perfect for UV-Vis spectroscopy, nucleic acid and protein quantification, and high-precision measurements across broad wavelengths.
- Caution: Quartz is essential for UV measurements. Using glass or plastic cuvettes below 300 nm will lead to inaccurate data [3].
- IR Quartz (Infrared Quartz) :
- Wavelength Range: Extends into the mid-IR range (~220 nm to 3,500 nm) [2].
- Pros: Excellent transmission in the IR (~88% at 2730 nm).
- Cons: Very expensive and still absorbs in the far-IR range (>3.5 µm), where specialized windows are needed.
- Use Cases: Specialized for IR spectrophotometers and applications requiring transmission into the mid-IR range.
- Tip: IR quartz is crucial for mid-IR spectroscopy, but most UV-Vis applications use standard UV quartz [2].
- Plastic Cuvettes :
- Wavelength Range: Transmits light in the visible range (~380–780 nm) [3].
- Pros: Low cost, disposable, and no risk of shattering. Adequate transparency for visible wavelengths (~80% at 400 nm).
- Cons: Not UV-transparent (absorbs strongly below ~380 nm), less precise optics, and limited chemical resistance.
- Use Cases: Best for visible-light applications such as protein assays (BCA, Bradford), bacterial OD measurements, and teaching labs.
- Warning: Do not use plastic cuvettes for UV measurements (e.g., DNA quantification) as they absorb UV light and distort results [3].
- UV-Transparent Plastic :
- Wavelength Range: Can transmit UV light down to ~220–270 nm.
- Pros: Convenient, disposable, and usable in UV range (~220–900 nm).
- Cons: More expensive than standard plastic, lower optical quality than quartz, and limited chemical resistance.
- Use Cases: A practical, disposable alternative for UV work when quartz cuvettes are not available.
- Tip: Ensure that the UV-Transparent plastic cuvette covers the full range you need. Some may only transmit down to 230 nm, which works for DNA 260 nm but may be insufficient for deeper UV [2].
- Other Materials :
- Sapphire: Extremely hard, scratch-resistant, and transparent across UV-Vis.
- Specialized Crystal Windows (e.g., CaF₂, NaCl): Used for deep UV or IR applications, typically in niche or custom applications.
- Tip: These materials are generally used for specific applications (e.g., high-pressure cells, mid-IR spectroscopy) and tend to be expensive [3].

Spectral Range Summary
| Material | Wavelength Range | Use Cases |
|---|---|---|
| Optical Glass | Visible (~340–700 nm) | Colorimetric assays, OD measurements in cell cultures, visible light work [2]. |
| UV-Grade Quartz | UV-Vis-NIR (~190 nm to 2,500 nm) | UV-Vis spectroscopy, nucleic acid and protein quantification, high-precision work [2]. |
| IR Quartz | UV-Vis-IR (~220 nm to 3,500 nm) | Mid-IR spectroscopy, laser applications requiring transmission in the IR range [2]. |
| Plastic Cuvettes | Visible (~380–780 nm) | Protein assays, bacterial OD measurements, teaching labs [3]. |
| UV-Transparent Plastic | UV (~220–900 nm) | Disposable cuvettes for UV work when quartz is not available [3]. |
Choosing the Right Cuvette Material
- For UV and Broad Wavelength Work: Quartz is the gold standard, offering transparency from UV to NIR, and is essential for measurements below 300 nm [2].
- Tip: If you’re unsure, quartz is your safest bet—it works for UV, visible, and NIR wavelengths [2].
- For Visible-Range Work: Plastic or Optical Glass are cost-effective for visible wavelengths (~400–700 nm) but are not suitable for UV work [3].
- Caution: If UV measurements are required, don’t compromise with glass or plastic [3].
Other Considerations 🧫
- Chemical Compatibility:
- Glass and Quartz: Highly compatible with organic solvents, acids, and bases.
- Plastic: Sensitive to many organic solvents (e.g., acetone, chloroform), which may dissolve or craze the plastic.
- Tip: For organic solvents or extreme conditions, use glass or quartz. They have higher chemical resistance compared to plastic [3].
- Cost 💸:
- Plastic Cuvettes: Cheapest, often less than $1 each in bulk.
- Optical Glass and Quartz: More expensive upfront but reusable many times.
- Tip: If your work involves UV measurements or high accuracy, invest in quartz cuvettes—they last for years if treated carefully [2].
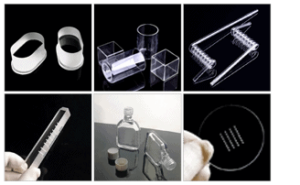
Common Cuvette Sizes and Sample Volume Types
Cuvettes come in various sizes and internal volume capacities to accommodate different sample volumes. Although standard cuvettes have similar outer dimensions to fit into instrument holders, the internal dimensions—and thus the volume of sample required—can vary significantly. The choice between macro, semi-micro, or micro cuvettes depends on the amount of sample you have available for analysis. All of these cuvettes typically have a 10 mm (1 cm) path length, unless otherwise specified, but differ in the cross-sectional area of the sample chamber and the chamber’s height.
Common Cuvette Size Categories:
Macro Cuvettes :
- Volume Capacity: Typically holds volumes >3.5 mL.
- Dimensions: A standard 10 mm pathlength cuvette with a 10 × 10 mm internal width and full height (~45 mm) holds about 3.5 mL. Some larger cuvettes can hold 20–35 mL.
- Use Case: Ideal for abundant samples or when a larger volume is needed for thermal stability or mixing. Larger cuvettes provide better contact with temperature-controlled holders, making them suitable for temperature-sensitive applications [4].
- Tip: Use macro cuvettes for applications where sample volume is abundant and thermal stability or large volumes are crucial.


Standard (Regular) Cuvettes :
- Volume Capacity: Requires approximately 3.0–3.5 mL to fill.
- Dimensions: Exterior dimensions are ~12.5 × 12.5 × 45 mm, fitting into nearly all spectrophotometers.
- Use Case: The most commonly used cuvette size, typically used in general-purpose UV-Vis spectrophotometry. If a cuvette isn’t labeled with a specific type, it’s likely a standard 1 cm, 3.5 mL type.
- Caution: If in doubt, a standard 3.5 mL cuvette is a safe choice for general-purpose spectrophotometry.


Semi-Micro Cuvettes 🧬:
- Volume Capacity: Holds moderate volumes (~0.35 to 3.0 mL).
- Dimensions: Typically features a narrower internal width (e.g., 4 mm instead of 10 mm) or shorter height, reducing the sample volume while maintaining the 10 mm path length. Some semi-micro cuvettes hold 1.0–2.5 mL.
- Use Case: Ideal for situations where sample volume is limited, but a 10 mm path length is required for accuracy. Common in biochemical assays where obtaining >1 mL of purified sample might be difficult.
- Tip: Semi-micro cuvettes are perfect when you’re dealing with limited samples but need accurate 10 mm path length measurements.


Micro (Sub-Micro / Ultra-Micro) Cuvettes :
- Volume Capacity: Holds small sample volumes ranging from a few microliters up to ~350 µL.
- Dimensions: These cuvettes have smaller interior widths or heights, drastically reducing sample volume. Some ultra-micro cuvettes hold as little as 50 µL or less.
- Use Case: Ideal when sample volumes are scarce, such as precious protein samples, clinical samples, or limited reagents. Also used for DNA measurements with very small sample sizes.
- Important: Micro cuvettes often have a specific Z-height (the vertical position of the light beam relative to the cuvette base) that must match the spectrometer’s beam position [4].
- Tip: Micro cuvettes are critical when sample volume is limited, but ensure proper alignment of the cuvette with the instrument for accurate readings.


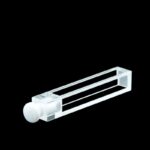
Flow-Through Cuvettes 🔄:
- Volume Capacity: Ranges from micro-volume (50–200 µL) to larger volumes.
- Use Case: Designed for continuous flow of liquid through the cuvette, commonly used in HPLC detectors, auto-sampling systems, or kinetics experiments. They allow for sequential sample analysis or real-time reaction monitoring.
- Tip: Flow-through cuvettes are essential for continuous analysis of samples or for systems requiring sequential analysis like HPLC.
- Example: A micro flow cell with a 1 mm path length and ~60 µL internal volume can be used for continuous analysis of very small sample volumes. These cuvettes are made from glass or quartz in sturdy frames and can withstand several bars of pressure [6].


Summary: Selecting the Right Cuvette Size
Cuvettes come in a wide range of sizes to accommodate volumes from sub-50 µL to tens of mL. The outer dimensions are typically standardized to fit spectrophotometers, ensuring compatibility even for small-volume cuvettes. Manufacturers define these categories similarly to the following:
- Macro: >3.5 mL
- Semi-Micro: 0.35–3.5 mL
- Sub-Micro: <0.35 mL [2]
Always ensure you have slightly more sample than the minimum required volume to ensure proper filling. Many protocols recommend filling cuvettes to ~80% full to avoid meniscus effects [2].
Tip :
- If sample volume is not a limiting factor, use a standard 3.5 mL cuvette. It’s simple to use and doesn’t require special alignment or adapters.
- If you routinely work with low volumes, investing in semi-micro or micro cuvettes (and any required adapter for your instrument) will help save precious sample while still providing accurate measurements with a 1 cm path length.
Path Length and Its Importance
The path length of a cuvette is the internal distance that light travels through the sample, essentially the width of the sample chamber between the two optical windows. This path length (typically noted in centimeters) directly influences absorbance readings according to Beer’s Law (A = ε·c·l), meaning that it impacts the measurement linearly.
Most cuvettes for spectrophotometry are designed with a standard path length of 10 mm (1 cm), simplifying calculations. For example, a “standard 10 mm cuvette” has outer dimensions of approximately 12.5 mm, with ~1.25 mm glass walls on each side, leaving an inner path length of 10.0 mm [2].
Why Path Length Matters
Standardization :
Many instrument calibrations, methods, and result units assume a 1 cm path length. For example, extinction coefficients for biomolecules are often provided for a 1 cm path. This standardization makes calculations straightforward and consistent.
Sensitivity :
A longer path length means that the light passes through more of the sample, which increases absorbance for a given concentration. This is especially useful for very dilute samples. For instance, a 5 or 10 cm path length cell can detect lower concentrations due to the proportionate increase in absorbance [7]. On the other hand, a shorter path (e.g., 1 mm) is better suited for high-concentration samples, as it helps avoid saturating the detector.
Instrument Compatibility 🔧:
Many spectrometers are designed to hold 10 mm cells by default. However, shorter or longer path length cuvettes can often be used with adapters or special holders [2].
Cuvette Path Length Range :
Cuvettes are available in a variety of path lengths ranging from 0.1 mm up to 100 mm (10 cm), and adjustable path length cells are also available [7]. However, when using a non-1 cm path length, you need to be mindful of the following:
- Mathematical Correction: For example, a 5 mm path length will produce half the absorbance of a 10 mm path for the same sample. To normalize, multiply the reading by 2 to adjust to the 1 cm standard.
- Instrument Configuration: If your instrument allows, you can configure it with the correct path length setting for accurate measurements.


Common Alternate Path Lengths 🔄:
- Short-Path Cuvettes: 5 mm and 2 mm cuvettes are commonly used for high-concentration samples.
- Long-Path Cuvettes: 20 mm, 50 mm, and 100 mm cuvettes are often used in low concentration measurements or water analysis, especially in environmental chemistry.
Keep in mind that 100 mm path cells may require up to 40+ mL of sample and specialized holders.
Using Different Path Lengths in Practice
- Short Path Cuvettes: If you have a 10 mm holder but need a shorter path length, you can use a spacer—a plug that takes up space so the short cuvette is correctly aligned. For example, micro cuvettes may include a 4 mm clear-sided cube at the bottom to provide a 10 mm path in a tiny chamber.
- Tip: Short-path cuvettes can be used for high-concentration samples, and adapters can help you fit them into standard holders.
- Long-Path Cuvettes: If you want to use a 20–100 mm long-path cuvette, they often require a dedicated holder due to their increased length. Some spectrometers come with adjustable path length holders, or you may need a different instrument.
- Tip: Long-path cuvettes are often used for environmental and water analysis but may require special holders or instruments.
Illustration of Path Lengths 🖼:
The diagram below illustrates cuvettes with various path lengths ranging from 1 mm to 100 mm. Short-path cuvettes (1–5 mm) are commonly used for high absorbance samples, while long-path cells (20–100 mm) increase sensitivity for low-concentration samples [7].


Path Length Consistency
Regardless of the path length you choose, ensure its accuracy! Standard cuvettes are manufactured with tight tolerances (often ±0.01 mm for a 10.00 mm path) [2]. If you’re using a pair of cuvettes (e.g., sample vs. reference), both should have the same path length and ideally be matched in transmission.
Some high-end cuvettes are sold as matched pairs with certified equal path lengths. Additionally, dual-path cuvettes exist, which have two separate chambers with different path lengths for measuring different dynamic ranges.
Summary ✨
- The 1 cm path length is the standard and easiest to work with.
- If you need to deviate from this standard, do so mindfully and make sure to apply the appropriate corrections in your calculations.
- Document any changes to the path length in reports and calculations to ensure accuracy.
Tip: Use standard 1 cm cuvettes whenever possible. If you need a different path length, ensure correct calibration and adjustments to avoid measurement errors.
Choosing the Right Cuvette: Key Considerations
Selecting the right cuvette involves balancing factors such as material, volume, and path length against the specific needs of your experiment. Below, we discuss some common use-cases and provide practical recommendations for choosing the best cuvette for each scenario.
UV-Vis Absorbance (General) 🧬
When measuring UV wavelengths (200–340 nm)—for example, nucleic acid quantification at 260 nm, protein quantification at 280 nm, or chemical assays in the UV range—you must use UV-transparent cuvettes.
- Best Choice: Quartz cuvettes ensure no UV cutoff and are ideal for accurate measurements in the UV range [4].
- Avoid: Standard glass or cheap plastic cuvettes, as they absorb in the UV range and will invalidate your readings [3].
- Budget-Friendly Option: If cost or convenience is a concern, consider disposable UV-transparent plastic cuvettes, but check their lower wavelength limit (typically ~230 nm, which is suitable for 260 nm DNA quantification but may not be adequate for <230 nm deep UV measurements).
- Tip: For general-purpose UV and visible measurements, have a couple of quartz 1 cm cuvettes on hand. For large batches of visible samples, disposable PS cuvettes are a convenient option.
Fluorescence and Light Scattering ✨
Fluorescence and light scattering techniques involve detecting light at an angle (usually 90°) to the excitation beam, which requires cuvettes with clear windows on all sides.
- Best Choice: Cuvettes with four clear sides, typically made of high-quality quartz, to avoid autofluorescence from the cuvette material itself [2].
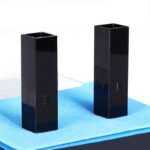
- Alternative: Black-walled cuvettes (with opaque sides and bottom) are useful for minimizing stray excitation light and reflections. These cuvettes absorb stray light while allowing fluorescence to be measured from the clear side.
- Tip: Use a fluorescence-grade quartz cuvette with four polished windows for most fluorescence experiments. If high background is a concern, consider a black quartz cuvette for improved signal-to-noise ratio (SNR).
- Important: Ensure the cuvette fits your instrument’s holder. Some fluorometers accept standard 12.5 mm square cuvettes, while others, like plate readers, may not use cuvettes at all.


Infrared (IR) Spectroscopy
For measuring absorbance in the IR region (particularly mid-IR, 2.5–25 µm or 4000–400 cm⁻¹), standard cuvettes are not suitable. IR measurements require specialized cells.
- Mid-IR Measurements: Use specialized IR cells made from salts like NaCl, KBr, or CaF₂, which are highly moisture-sensitive and suitable for FTIR spectrometers. These are outside the scope of typical UV-Vis cuvettes.
- Near-IR Measurements (780–2500 nm): Quartz cuvettes are suitable for near-IR spectrophotometry, and many modern UV-Vis spectrometers can detect up to 1500 nm. Tip: For most near-IR work up to 2500 nm, a quartz cuvette is sufficient. For mid-IR measurements, use IR cells recommended by the FTIR manufacturer.
Concentration Extremes
When working with very concentrated or very dilute samples, you may need to choose a different path length to avoid saturating the detector or ensure better sensitivity.
- High Concentration Samples: For dense bacterial cultures or samples with high absorbance, a short-path cuvette (e.g., 1 mm) can be used to avoid exceeding the instrument’s linear range.
- Low Concentration Samples: For trace concentration measurements (e.g., pollutants in water), a long-path cuvette (e.g., 50–100 mm) can increase absorbance and improve detection sensitivity. Tip: If your spectrophotometer supports it, use short-path cuvettes for high-concentration samples and long-path cuvettes for very low-concentration analyses.
Limited Sample Volume
If you often work with small sample volumes (common in protein research, clinical samples, or when samples are scarce), there are specialized cuvettes and systems for micro-volume measurements.
- Micro-Volume Cuvettes: These are designed for small sample volumes (as low as 50 µL), and the path length is still typically 10 mm. However, you must ensure the cuvette is positioned correctly to be in the light beam.
- Adapters: Some instruments offer micro cuvette adapters that allow the use of smaller cuvettes (such as 1 mm path length cells) to simulate the effect of a diluted 1 cm path cuvette. Tip: For very small sample volumes, consider using a Hellma TrayCell or other micro-volume cuvette systems that allow measurements with just a drop of sample.


Summary of Recommendations
| Use Case | Cuvette Type | Material | Path Length | Recommendation |
|---|---|---|---|---|
| General UV-Vis Absorbance | Standard or disposable cuvette | Quartz or plastic | 10 mm | Use quartz for UV measurements; disposable plastic for visible-range applications. |
| Fluorescence | Fluorescence-grade cuvette with 4 clear sides | Quartz | 10 mm | Use a fluorescence-grade quartz cuvette with four polished sides. |
| IR Spectroscopy | IR cuvette (CaF₂, NaCl, KBr) | IR quartz/salts | Varies | Use specialized IR cells for mid-IR; quartz for near-IR. |
| High-Concentration Samples | Short-path cuvette (1 mm) | Quartz | 1 mm | Use short-path cuvettes to avoid saturating the detector in high-concentration samples. |
| Low-Concentration Samples | Long-path cuvette (50–100 mm) | Quartz | 50–100 mm | Use long-path cuvettes for increased sensitivity in low-concentration samples. |
| Limited Sample Volume | Micro-volume cuvette with adapters or TrayCell | Quartz | 1 mm | Use micro-volume cuvettes or a TrayCell for small samples. |
Final Tips 📝
- For routine UV-Vis work, 1 cm cuvettes (quartz for UV, glass for visible) are the standard choice.
- Specialty cuvettes are recommended for specific applications like fluorescence, IR spectroscopy, and micro-volume work.
- Always double-check the cuvette specifications (material for wavelength range, volume for sample amount, and path length for expected absorbance range).
Instrument Compatibility and Cuvette Dimensions
Most modern spectrophotometers and fluorometers are designed around the standard cuvette form factor, which is the classic 1 cm square cell. However, it’s important to ensure that the cuvette you choose is compatible with your instrument in three main aspects: outer dimensions, window alignment (Z-height), and required holders/adapters.
Outer Dimensions
Standard spectrophotometer cuvettes typically have outer dimensions of 12.5 mm × 12.5 mm for the cross-section and are usually ~45 mm tall [5]. These dimensions allow the cuvette to fit in virtually all bench-top spectrophotometers. However, if you use a cuvette with an unusual outer size or shape (e.g., long rectangular cells or cylindrical cuvettes), you may need a different holder.
- Standard Cuvettes: Most cuvettes for UV-Vis applications are designed to fit the standard 1 cm square holder.
- Specialized Instruments: Some instruments, such as Hach colorimeters or older spectrophotometer kits, may use round cuvettes or test tubes (e.g., 13 mm round vials), which are instrument-specific.
- Tip: Always verify whether your cuvette fits the instrument holder. If a product listing says “fits standard spectrophotometer cell holders,” it is likely to be compatible with most instruments.
Window Height (Z-Dimension)
The Z-dimension, or window height, refers to the vertical alignment of the cuvette window relative to the instrument’s light beam. This is particularly important for micro-volume cuvettes and short cuvettes.
- Standard Cuvettes: Standard 3.5 mL cuvettes typically have an internal height of ~15 mm to the center of the window, allowing the beam to pass through the center of the cuvette.
- Micro-Volume Cuvettes: For micro cuvettes, the Z-height must be matched to the instrument’s fixed light beam height. Common center heights are 8.5 mm, 15 mm, or 20 mm [4].
- Warning: If you use a micro cuvette designed for one Z-height in an instrument with a different Z-height, the beam might pass above or below the sample, resulting in no signal. Always check your instrument’s manual for the correct Z-height, or test with a small sample to confirm.
- Tip: Some cuvette manufacturers offer micro cuvettes in versions for 8.5 mm or 15 mm Z-heights, so be sure to select the one compatible with your instrument [9].

Cuvette Holder and Accessories
If you plan to use non-standard cuvettes (such as long-path cells or flow-through cuvettes), it’s important to ensure that your instrument has the appropriate holder or mounts.
- Flow-Through Cuvettes: These cuvettes are designed to allow continuous flow of liquid through the sample chamber. They typically require a flow cell holder that connects to tubing, allowing the cuvette to be held in place during analysis.
- Tip: Some cuvette manufacturers provide specific holders and adapters for flow-through cells, so make sure to consult the manufacturer’s recommendations.


- Thermostatted Cuvette Holders: If you’re using semi-micro cuvettes, ensure the holder is designed for small cells to provide good thermal contact.
- Tip: Some spectrophotometers come with interchangeable inserts to accommodate smaller cuvettes and maintain proper thermal stability.
Specialized Instruments
Some instruments do not use standard cuvettes at all:
- Plate Readers: These use microplates rather than cuvettes.
- Dedicated DNA Quantifiers: Some instruments use built-in microvolume surfaces for measurements, eliminating the need for cuvettes.
In these cases, cuvette selection is not relevant, and you must use the format recommended by the instrument.
Tip: For standard spectrophotometers and fluorometers, you have the flexibility to choose cuvettes as long as they physically fit and align with the instrument’s setup.
General Cuvette Compatibility ⚙
In practice, compatibility is generally straightforward for standard 1 cm cuvettes. This is true for most spectrophotometers, regardless of the brand. However, caution is needed when deviating from the standard (e.g., tiny or oddly shaped cuvettes).
- Standard 1 cm Cuvettes: These will generally work in any brand spectrophotometer [5].
- Non-Standard Cuvettes: If you plan to purchase a new type of cuvette, it’s a good idea to buy one or two first and test them in your machine before purchasing a whole pack. This helps ensure the cuvette fits properly and aligns with the light beam.
Summary 📝
- Standardization: Most instruments are designed for standard 1 cm square cuvettes with outer dimensions of 12.5 mm × 12.5 mm and ~45 mm height.
- Z-Dimension: Ensure that the Z-height (window height) matches your instrument’s light beam alignment to avoid misalignment or no signal.
- Adapters: For non-standard cuvettes, you may need adapters or special holders to ensure proper alignment and handling.
Tip: If you plan to use non-standard cuvettes, check with the instrument manufacturer for compatibility and recommended accessories.
Cuvette Handling, Cleaning, and Maintenance
Proper care and handling of cuvettes, especially reusable quartz cuvettes, are essential for maintaining their longevity and ensuring accurate results. Cuvettes are precision optical components and should be treated with care at every step of their use.
Handling Cuvettes
- How to Handle: Always handle cuvettes by the frosted or opaque sides (if they have them), or by the edges of the clear sides if all sides are transparent. Avoid touching the clear optical faces with your fingers. Fingerprints and smudges can scatter light and absorb UV, leading to inaccurate measurements.
- Gloves: It’s good practice to wear clean gloves when handling cuvettes. This prevents fingerprints and protects the cuvette from oils, solvents, and acids from your skin [11].
- Avoid Tools: Do not use metal tongs or hard tools to handle cuvettes as these can scratch or chip the glass [11].
- Tip: Use the frosted sides for handling and marking, as they are designed for this purpose.

Cleaning Cuvettes 🧽
- Immediate Rinsing: After use, rinse the cuvette thoroughly with a solvent that will remove the sample. For aqueous samples, use deionized water; for organic samples, rinse with a compatible solvent (e.g., ethanol) followed by water.
- No Dried Residues: Do not allow residues to dry in the cuvette as dried samples or precipitates are harder to clean.
- Stubborn Residues: Use a mild detergent solution or a cuvette-specific cleaning solution (e.g., Hellmanex) to soak and clean stubborn residues. Avoid abrasive brushes or scrubbers for optical surfaces. Use a soft cotton swab or pipe cleaner wrapped in lens paper if gentle cleaning is needed.
- Tip: For organic residues, rinse with acetone (if the cuvette material allows) followed by alcohol and water. This combination can remove grease and allow for thorough cleaning.
- Quartz Cuvettes: Quartz can withstand strong acids and bases (e.g., nitric acid or sulfuric acid-peroxide mix) if needed for cleaning, but these are last resorts and require very thorough rinsing afterward.

Preventing Scratches 🛑
- Avoid Contact with Hard Objects: Cuvette windows are finely polished, so avoid contact with any hard objects (e.g., scraping with a metal needle, stacking cuvettes where they rub).
- Dedicated Brushes: Use dedicated soft brushes or swabs for cuvette cleaning to avoid abrasive dust from other sources.
- Tip: Even tiny scratches can scatter light, affecting absorbance or causing stray light in fluorescence measurements.
Storage 🏠
- Proper Storage: Always store cuvettes in a protected case or rack where they won’t tip over or collide with each other [11]. Foam-lined boxes with individual slots are ideal for storage.
- Dry Before Storing: After cleaning and rinsing, flush the cuvette with acetone or alcohol and let it air dry. Use clean compressed air or nitrogen to gently blow dry the cuvette. Store cuvettes with the caps off to allow complete drying, then cap or cover them to prevent dust.
- Tip: Always store cuvettes in a dry place to avoid water spots or fungal growth.
- Day-to-Day Use: When performing multiple measurements, use a cuvette rack to hold cuvettes upright. Never leave a cuvette lying on its side, as it could roll off or allow solvent to creep into unwanted areas.
- Long-Term Storage: For quartz cuvettes, keep them away from acids or fumes that could etch the surface. Avoid prolonged exposure to UV light to prevent solarization of the glass.

Dedicated vs. Shared Use 🔒
- Dedicated Cuvettes: If possible, designate certain cuvettes for specific tasks. For example, keep one cuvette as the “reference blank” and use it only for solvent or blank readings to keep it pristine.
- Hazardous Materials: For cuvettes used with hazardous materials (e.g., radioactive or biohazardous samples), label them appropriately and handle with care. If disposable cuvettes are used, dispose of them properly after use.
- Warning: Never use the same cuvette for incompatible sample types without thoroughly cleaning it between uses (e.g., switching from an organic solvent sample to a trace metal analysis sample).
Inspection
- Routine Checks: Regularly inspect cuvettes for cloudiness, scratches, or chips. Hold the cuvette up to light to check for clarity. Minor scratches may not affect absorbance but can scatter light in fluorescence measurements.
- Etching or Cloudiness: If the cuvette becomes etched or cloudy (due to improper cleaning or solvent damage), it should be replaced as it is no longer reliable for quantitative work.
- Tip: Check cuvettes for warping, especially plastic cuvettes, which can warp if autoclaved or exposed to certain solvents. Any deformation can distort the path length or cause leakage.
Maintaining Calibration
- Calibration Checks: For highly sensitive work, periodically re-calibrate or check the path length of your cuvettes. One way to do this is to fill the cuvette with a standard solution of known absorbance and verify that you get expected readings.
- Water Check: Fill the cuvette with water and verify that the spectrophotometer reads essentially zero absorbance across the range (indicating no unexpected absorbance by the cuvette).
- Tip: For most labs, routine calibration of cuvettes is not needed unless there is a specific issue. Quality cuvettes generally maintain their stability over time.
Plastic Cuvettes 🧴
Plastic cuvettes are typically disposable and not meant for solvent cleaning or extended reuse. They are generally used for one or a few measurements and then discarded. Cleaning them with solvents may not remove all adsorbed molecules, and plastic is more prone to scratching.
- Reuse Restrictions: If reusing a plastic cuvette, limit it to the same assay or sample type to avoid cross-contamination. Rinse only with water, as organic solvents may damage the plastic.
- Warning: Never attempt to clean a polystyrene cuvette with solvents, as it will likely ruin the cuvette.
Summary
- Handle cuvettes carefully, using the frosted or opaque sides and wearing gloves to avoid fingerprints.
- Clean immediately after use, ensuring no residues dry inside the cuvette.
- Prevent scratches by avoiding contact with hard objects and using soft cleaning tools.
- Store cuvettes properly in a dry, protected case to avoid damage and contamination.
- Inspect and maintain regularly to ensure cuvettes remain in optimal condition for accurate measurements.

Treat your cuvettes like high-quality optical instruments, and they will continue to provide reliable results for years to come.
Cuvette Accessories and Customization Options
Beyond the basic cuvette itself, there are several accessories and customization options available that can enhance cuvette functionality or adapt it to specific experimental needs.
Cuvette Covers and Caps 🧳
Cuvette covers and caps are essential for preventing evaporation, contamination, and enabling mixing during experiments. Various options are available:
- PTFE (Teflon) Lids: Simple and reusable, these lids sit on top of cuvettes to prevent evaporation and contamination. While not airtight, they are inert and suitable for most applications [3].
- Silicone Rubber Caps or PTFE Stoppers: These offer a better seal and make the cuvette nearly airtight, allowing for gentle shaking without spillage. Ideal for mixing and preventing air contamination [3].
- Screw Caps with Septa: These provide the most secure closure. Screw caps often include a rubber septum, allowing you to inject a sample with a syringe without opening the cuvette. Perfect for experiments requiring airtight conditions, like anaerobic experiments or adding reagents while the cuvette is in the instrument [3]. Tip: For airtight sealing or reagent addition, use a screw-cap cuvette with a septum. This is particularly useful for keeping out air during anaerobic experiments or adding reagents into the cuvette after it’s in the instrument.
Cuvette Holders and Racks 🧰
Proper storage and handling during measurements are essential to prevent spills and ensure stability. Cuvette racks and specialized holders can help.
- Cuvette Racks: Acrylic or foam racks are available to hold cuvettes upright and avoid tipping or spilling.
- Thermostatted Holders: These holders are ideal for temperature-sensitive assays, providing circulating water to maintain a constant temperature around the cuvette.
- Magnetic Stirring Holders: These hold a small magnetic stir bar underneath the cuvette and allow you to stir the sample during measurements to ensure uniformity.
- Multi-Cuvette Changers: For high-throughput experiments, some spectrophotometers offer carousel-style holders that can measure multiple cuvettes sequentially. Tip: If you plan to run temperature-sensitive kinetic assays, a thermostatted cuvette holder with stirring is ideal to ensure uniform temperature and prevent settling. Warning: Always use a cuvette lid when stirring to avoid splashing and contamination.
Optical Filters and Inserts 🔲
In addition to cuvettes, there are various accessories designed to be placed in the light path to modify the beam or adjust the path length:
- Cuvette Filter Holders: These allow for the insertion of optical filters (such as cutoff filters) directly in front of the cuvette.
- Path Length Reducers/Inserts: These are spacers that reduce the effective path length of a cuvette (for example, converting a 10 mm cuvette to a 5 mm path length). Tip: If you need a shorter path length, use an insert to modify a standard cuvette (e.g., converting 10 mm to 5 mm).
Customized Cuvettes
When an off-the-shelf cuvette can’t deliver the optical path, volume, or integration you need, most specialty glass and quartz shops will build one to spec. Below is a more detailed snapshot of what can be customized and what to expect during the design process.
Going Beyond Standard Cuvettes—A Deeper Look at Custom Fabrication🔧
| Custom Feature | Typical Options & Technical Notes | Why It Matters |
|---|---|---|
| Path Length & Geometry | • Sub-millimeter micro-path (< 0.1 mm), extended (≥ 100 mm), or asymmetric shapes • Tall narrow cells for low-volume long-path assays (e.g., 2 mm × 40 mm) • Cylindrical, trapezoidal, or wedge designs for light-scattering work | Maintains Beer’s-law linearity at extreme concentrations; fits specialized beam geometries |
| Optical Windows | • UV-grade quartz, IR fused silica, sapphire, CaF₂, or BK-7 glass • 40-20 or better scratch–dig finish; λ/10 flatness • Anti-reflection or reflective metal coatings • Blackened/opaque sides to suppress stray light in fluorescence | Extends spectral range, reduces reflection losses, improves signal-to-noise |
| Ports & Interfaces | • Side or end-mounted Luer-Lock or M6 threads for flow injection • Fiber-optic feedthroughs (SMA 905, FC/PC) • Electrodes or thermocouple wells sealed into the wall | Enables real-time mixing, online detection, temperature or electrochemical control |
| Sealing & Pressure Handling | • Frit-sealed quartz, solvent-resistant PEEK caps, metal gaskets • Rated up to 200 bar and 200 °C for in-situ catalysis or supercritical studies | Safely tackles high-pressure kinetics and hydrothermal synthesis |
| Surface Treatments | • Hydrophobic, hydrophilic, or silanized inner walls • Mirror-grade polish for Raman or cavity-enhanced spectroscopy | Controls wetting, reduces carry-over, or boosts optical finesse |
| Certification & Tolerancing | • NIST-traceable path-length certification (± 0.02 mm) • CAD drawings with GD&T specs, serial-numbered QA reports | Guarantees reproducibility and compliance in regulated labs |
How the Custom Process Usually Works
- Define Critical Parameters
Provide a sketch or CAD drawing noting internal path length, external footprint, window material, and any ports or coatings. - Feasibility & Quotation
The manufacturer checks tooling constraints (e.g., minimum grinding thickness ≈ 0.7 mm in quartz) and supplies a cost/lead-time estimate—typical turnaround is 3–6 weeks for straightforward jobs, 8–12 weeks for complex multi-component cells. - Prototype or First Article
A single pilot cell may be produced to validate fit-to-instrument and optical performance before the production run. - Quality Assurance
Finished cells are inspected for path-length accuracy, window parallelism (< 3 arc min), and surface finish. Certificates are shipped with the product.
Tip — Engage early: share instrument drawings, beam height, and holder constraints with the cuvette maker. A 10-minute call can prevent mismatched z-height or port-interference issues later. Custom micro-volume cells (< 50 µL) often need special stoppers and pipette tips; ask for compatible accessories up-front. Custom flow cells with Luer or PEEK ports can be ordered in the same step, ensuring leak-free integration with peristaltic or syringe pumps [1].
By leveraging these advanced options, researchers can push assays into regimes—ultra-dilute analytics, high-pressure catalysis, on-chip microfluidics—where standard cuvettes simply can’t go.


Calibration and Reference Accessories
Some accessories are essential for maintaining calibration and verifying your instrument’s performance:
- Calibration Standards: Neutral density filters or reference materials that fit into cuvette slots can help validate spectrophotometer performance.
- Cuvette Calibration Tools: An alignment target can be used to check the alignment of the cuvette and instrument, ensuring accurate measurements. Tip: When performing highly sensitive work, consider getting calibration tools to verify that your cuvettes and spectrophotometer are properly aligned and functioning.
Additional Recommendations 🧳
When purchasing cuvettes, consider adding these accessories to ensure your cuvettes stay in optimal condition:
- Spare Caps: Having a few spare caps on hand is always useful, especially when working with reagents that require airtight seals.
- Cleaning Kits: Some manufacturers sell cleaning kits with cleaning solution and lint-free wipes specifically designed for cuvettes. These help extend cuvette life and maintain usability.
- Storage Cases: If a cuvette doesn’t come with a storage case, purchasing one can help protect it from dust, scratches, and other contaminants.
Summary
To ensure the best results and longevity for your cuvettes:
- Cuvette Covers and Caps: Use PTFE lids, silicone rubber caps, or screw caps with septa for protection, mixing, or adding reagents.
- Cuvette Holders and Racks: Use racks for proper storage and holders with temperature control or stirring capabilities for sensitive assays.
- Optical Filters and Inserts: Utilize these for adjusting the light path or modifying the path length to fit your experimental requirements.
- Custom Cuvettes: Reach out for custom-made cuvettes if standard sizes and configurations don’t meet your needs.
- Calibration and Reference Accessories: Consider acquiring calibration tools to maintain the accuracy of your measurements.
By selecting the right accessories and ensuring proper handling, cleaning, and maintenance, your cuvettes will provide reliable, long-term performance for a variety of experiments.
Quick Reference: Best Cuvette Choices for Common Scenarios
To tie everything together, here’s a quick guide to help you select the right cuvette for various common scenarios:
DNA/RNA or Protein UV Absorbance (260/280 nm) 🧬
- Best Choice: Quartz cuvette (1 cm path length) is ideal for accurate UV measurements.
- Limited Volume: If sample volume is <1 mL, use a micro quartz cuvette with appropriate Z-height or a microvolume device.
- Avoid: Glass or standard plastic cuvettes, as they absorb UV light and can skew your results [4].
Colorimetric Protein Assay (e.g., Bradford, BCA at 595 nm or 562 nm)
- Best Choice: Plastic disposable cuvettes (PS or PMMA) are convenient for high sample throughput and sufficiently transparent in the visible range [3].
- For Highest Precision: Optical glass or quartz cuvettes can be used, though they are not strictly necessary for these assays.
- Volume: Typically, ≥1 mL, so semi-micro or standard cuvettes are fine.
Cell Culture Optical Density (OD 600) Measurements 🧫
- Best Choice: Polystyrene disposable cuvettes are the standard for OD 600 in microbiology. They are cheap, and 600 nm is well within their transparent range [3].
- For High OD: If the OD >1, dilute the sample or use a short-path cuvette (e.g., 5 mm path length). In such cases, double the OD reading to adjust. Tip: For dense cultures, use short-path cuvettes and adjust your readings accordingly.
Fluorescence of a Visible Fluorophore (e.g., FITC, GFP) ✨
- Best Choice: Four-clear-sided quartz cuvette (1 cm path length) to maximize fluorescence signal [1].
- For Precious Samples: Consider a micro four-window cuvette if sample volume is limited. Ensure your fluorometer can focus the excitation and emission on the smaller volume.
- Black-Wall Cuvettes: These can be used to minimize stray light in fluorescence experiments, particularly when high background light is an issue.
Kinetics with Mixing (e.g., Enzyme Kinetics Requiring Stirring) ⚙
- Best Choice: Use a standard quartz or glass cuvette with a stir bar and stopper cap.
- Magnetic Stirring: Ensure the cuvette fits in a holder that allows a magnetic stirrer beneath it.
- Temperature-Controlled Measurements: Consider a macro cuvette for better thermal contact in temperature-sensitive assays. However, a standard cuvette usually works with Peltier holders. Tip: Use a cuvette with a stir bar if your experiment requires continuous mixing.
High-Throughput Measurements 🏁
- Best Choice: For multi-cuvette changers (e.g., 6–8 cuvettes in a carousel), use matched sets of glass or quartz cuvettes for consistency.
- Higher Throughput Needs: If your throughput needs are very high, consider switching to microplates, as many plate readers now perform measurements similar to multiple cuvettes.
Special Solvent or Extreme pH
- Best Choice: Use quartz or glass cuvettes and avoid plastic when working with strong solvents or extreme pH.
- Chemical-Resistant Cuvettes: Consider cuvettes made with fused quartz (no glue) for compatibility with solvents like chloroform, toluene, and strong acids [3]. Tip: For harsh chemicals, opt for chemical-resistant fused cuvettes to prevent leakage or etching.
Needing Long Path (Low Concentration Analytes)
- Best Choice: Use a long-path quartz flow cell or long tube cuvette if your instrument allows.
- Alternative: For moderate needs, use a 20–50 mm cuvette to boost sensitivity 2–5 times, as long as the instrument supports it. Tip: If you’re pushing detection limits, consider using a long-path cuvette to enhance sensitivity for low concentration analytes.
Quick Tips for All Scenarios 🔑
- Blanking: Always blank the instrument with the same cuvette filled with solvent or buffer before measuring your sample. This helps eliminate variation caused by cuvette-to-cuvette differences. Tip: For ultimate accuracy, use the same cuvette for blanking and measurement.
- Documentation: Keep a record of your cuvette usage, including path lengths, material, and any custom settings used in your experiments. This will help you avoid errors related to cuvette type or improper handling. Tip: Always document cuvette specifications when performing critical measurements to ensure traceability and consistency.
Conclusion 🏁
This guide provides a quick reference for selecting the appropriate cuvette based on common experimental needs. Whether you are working with UV-Vis absorbance, fluorescence, kinetics, or high-throughput measurements, understanding which cuvette to use ensures reliable, reproducible results. By matching the cuvette material, path length, and volume to your application, you can maximize the performance of your spectrophotometer and fluorometer.
Frequently Asked Questions (FAQs)
1. What is the difference between a micro-volume and a macro-volume cuvette?
Answer:
- Micro-volume cuvettes are designed to hold very small sample volumes, typically ranging from a few microliters to around 1 mL. They are often used in applications where the sample is limited, such as protein or DNA measurements.
- Macro-volume cuvettes, on the other hand, hold larger sample volumes, typically >3.5 mL, and are used when the sample volume is abundant. They are commonly used for general spectrophotometry applications.
2. Can I use a plastic cuvette for UV measurements?
Answer: No, plastic cuvettes are not recommended for UV measurements, especially in the UV range below 340 nm. Plastic cuvettes typically absorb UV light, which can distort results. For UV measurements, you should use quartz cuvettes, as they are transparent across the UV, visible, and NIR spectrums.
3. How do I choose the right cuvette material for my experiment?
Answer: The material of the cuvette should be selected based on the wavelength range of your measurements. For UV measurements, quartz is recommended, as it provides high transparency in the UV range. For visible light measurements, glass or plastic cuvettes can be used. If you are working with aggressive solvents or extreme pH levels, opt for chemical-resistant quartz or glass. Always ensure the material can handle the sample solvent and wavelength range for accurate readings.
4. Can I reuse a plastic cuvette?
Answer: Plastic cuvettes are typically disposable and should not be reused for different samples, especially when using organic solvents or chemical-based samples. If you do reuse them, ensure they are used for similar sample types to avoid cross-contamination. Always rinse them thoroughly with water after use.
5. Why is it important to avoid fingerprints on the cuvette?
Answer: Fingerprints can scatter light, increase absorbance, and contaminate the sample, leading to inaccurate measurements. Oils from your skin can also alter fluorescence readings, especially in UV measurements. To prevent this, always handle cuvettes by the frosted or opaque sides, wear gloves, and avoid touching the clear optical surfaces.
6. What should I do if my cuvette is scratched?
Answer: Scratches on cuvettes can scatter light and distort measurements, especially in fluorescence and absorbance experiments. If your cuvette has minor scratches, it may still be usable for absorbance measurements, but it should be replaced if it becomes cloudy, etched, or severely scratched. If a cuvette is scratched or chipped, it can lead to poor performance and inconsistent results, particularly in high-precision work.
7. How should I clean my cuvettes after use?
Answer: Immediately rinse the cuvette with an appropriate solvent (e.g., deionized water for aqueous samples, ethanol for organic samples). For stubborn residues, use a mild detergent or a cuvette-specific cleaning solution (e.g., Hellmanex) and allow it to soak. Never use abrasive brushes or scrubbers on the optical surfaces. A soft cotton swab or pipe cleaner can be used gently for cleaning. Always ensure that the cuvette is thoroughly rinsed and dried before storage.
8. How can I ensure proper alignment when using micro-volume cuvettes?
Answer: Micro-volume cuvettes often have specific Z-heights (vertical alignment of the light beam). Ensure that the cuvette is positioned correctly within the spectrophotometer to avoid the beam passing above or below the sample. Many manufacturers provide micro cuvettes in multiple Z-height options (e.g., 8.5 mm and 15 mm), so check the specifications of your instrument and cuvettes. Performing a simple test with a sample (e.g., a drop of dye) can confirm proper alignment.
9. Can I use the same cuvette for different types of samples? 🔄
Answer: It is not recommended to use the same cuvette for different types of samples, especially if the samples have different chemical properties. For example, if you’re moving from an organic solvent sample to a trace metal analysis sample, you should clean the cuvette thoroughly between uses to avoid cross-contamination. Consider designating a cuvette for specific sample types, such as a reference cuvette or a cuvette used only for blank readings.
10. How do I store cuvettes properly? 🏠
Answer: To store cuvettes properly, keep them in a protected case or rack to prevent them from tipping over or getting damaged. Ensure that the cuvettes are completely dry before storage to avoid water spots or the growth of fungus in damp environments. Store them upright and avoid stacking or handling cuvettes roughly. For long-term storage, quartz cuvettes should be kept away from acids or fumes that could etch the surface, and UV exposure should be minimized to avoid solarization of the glass.
References 📖
- The information provided is compiled from spectroscopic accessory guides and cuvette manufacturer datasheets, including transmission ranges for different materials [3], best practices in cuvette handling [11], and expert recommendations on matching cuvettes to applications [3]. These sources emphasize that choosing the correct cuvette (material, path length, volume) is crucial for accurate measurements and instrument compatibility [4].
- Which Cuvette Should You Use? Micro-Volume vs. Macro-Volume, VIS vs. UV, Glass vs. Plastic – CotsLab
https://cotslab.com/which-cuvette-should-you-use-micro-volume-vs-macro-volume-vis-vs-uv-glass-vs-plastic - Guide to Cuvettes | Spectrecology
https://spectrecology.com/blog/guide-to-cuvettes/ - Cuvettes for Spectrophotometer: a Comprehensive Guide – Qvarz
https://qvarz.com/cuvettes-for-spectrophotometer/ - Which Cuvette Is the Right One? Glass vs. Plastic, VIS vs. UV, Micro-Volume vs. Macro-Volume – Eppendorf US
https://www.eppendorf.com/us-en/lab-academy/lab-solutions/other/which-cuvette-is-the-right-one-glass-vs-plastic-vis-vs-uv-micro-volume-vs-macro-volume - Types Of Cuvettes And Cells | ICuvets Cells
https://icuvets.com/en/types-of-cuvettes-and-cells/ - Some Instructions for Using Flow-Through Cuvettes with Screw Connectors – Qvarz
https://qvarz.com/for-compact-flow-through-cuvettes-with-screw-connections/ - UV-vis Spectrophotometer Cuvette Selection Guide – Aireka Cells
https://airekacells.com/cuvette-guide#cuvette-path-length - Choosing the Material for Cuvettes: Quartz or Glass? – J&K Scientific
https://www.jk-sci.com/blogs/resource-center/choosing-the-material-for-cuvettes-quartz-or-glass - UV VIS Cuvettes – BRANDTECH Scientific
https://shop.brandtech.com/en/life-science-consumables/cuvettes.html - BrandTech Ultra-Micro UV-Transparent Spectrophotometry Cuvette
https://www.universalmedicalinc.com/brandtech-brand-uv-transparent-spectrophotometry-cuvette-ultra-micro.html - Best Practices for Handling and Storing Quartz Cuvettes – Qvarz
https://qvarz.com/best-practices-for-handling-and-storing-quartz-cuvettes%ef%bf%bc%ef%bf%bc%ef%bf%bc/ - Cell (Cuvette) Spinbar Magnetic Stirring Bar – Bel-Art Products
https://www.belart.com/cell-cuvette-spinbar-magnetic-stirring-bar.html
These links will provide additional resources and further readings on cuvettes and their applications. Let me know if you need more information or any other formatting!
Disclaimer
The information provided in this guide is intended for general informational purposes only and is based on commonly accepted practices in spectroscopic analysis and cuvette selection. While we have made every effort to ensure the accuracy of the content, the selection of cuvettes, accessories, and customization options should be made based on the specific needs of your experiment and in accordance with the recommendations provided by your instrument and cuvette manufacturers.
We strongly advise users to consult the user manuals of their spectrophotometers, fluorometers, and other laboratory equipment, as well as manufacturer datasheets for cuvettes and accessories, to confirm compatibility and ensure proper handling and usage.
The recommendations provided are based on standard laboratory practices and may not apply to all types of instruments, experiments, or conditions. Users should conduct their own research and testing to verify the suitability of any equipment or accessories for their specific applications.
We disclaim any liability for errors or omissions in the content, or for any consequences arising from the use of this information. Always follow safety guidelines and best practices for handling chemicals, hazardous materials, and delicate equipment to ensure a safe and effective laboratory environment.
Measured Transmission at Common Wavelengths
The following values are measured transmission percentages from our QC lab using a Shimadzu UV-2600i double-beam spectrophotometer (n=12 samples per material grade). Reflective losses (~7% per air interface) NOT subtracted. Use these to verify whether glass or quartz is mandatory for your wavelength.
| Wavelength | UV Quartz | Suprasil 300 | Optical Glass | PMMA | Application |
|---|---|---|---|---|---|
| 190 nm (deep UV) | 80% | 85% | <1% | 0% | Drug discovery (APIs) |
| 220 nm | 85% | 88% | <1% | 0% | Peptide bond region |
| 260 nm | 88% | 90% | 2% | 0% | DNA/RNA (A260) |
| 280 nm | 88% | 91% | 5% | 0% | Protein (A280) |
| 320 nm | 89% | 92% | 50% | 5% | Glass starts transmitting |
| 340 nm | 89% | 92% | 75% | 30% | NADH/NADPH |
| 595 nm | 91% | 93% | 92% | 90% | Bradford (proteins) |
| 600 nm | 91% | 93% | 92% | 90% | OD600 (bacteria) |
| 2500 nm (NIR) | 85% | 87% | 88% | 0% | NIR spectroscopy limit |
Source: Cuvet.Co QC lab, 2026 batch. Conditions: 10 mm path length, polished surfaces, DI water (n=1.33).
Beer-Lambert Calculation: Worked Example
Path length directly enters the Beer-Lambert equation: A = ε × c × ℓ. A 1% error in ℓ translates to a 1% error in c. Budget cuvettes with ±0.05 mm path length tolerance produce ±0.5% concentration error — significant when validating pharmaceutical batches against USP <851>.
BSA Protein at 280 nm — Inputs: measured absorbance A = 0.547; molar extinction coefficient ε(BSA) = 43,824 M⁻¹·cm⁻¹ at 280 nm (Pace et al. 1995); cuvette path length ℓ = 1.000 cm (standard 10 mm quartz).
Solve: c = A / (ε × ℓ) = 0.547 / (43,824 × 1.000) = 1.248 × 10⁻⁵ M
Convert to mg/mL: 1.248 × 10⁻⁵ M × 66,400 g/mol = 0.829 mg/mL BSA
Molar extinction coefficients (ε) for common analytes:
| Analyte | λ (nm) | ε (M⁻¹·cm⁻¹) | Material Required |
|---|---|---|---|
| DNA (double-stranded) | 260 | 6,600 per bp | Quartz only |
| RNA (single-stranded) | 260 | 8,250 per base | Quartz only |
| BSA (bovine serum albumin) | 280 | 43,824 | Quartz only |
| IgG (immunoglobulin G) | 280 | 210,000 | Quartz only |
| NADH | 340 | 6,220 | Quartz preferred |
| Coomassie (Bradford complex) | 595 | ~10,000 | Glass OK |
Real Pricing: What You Actually Pay at Cuvet.Co
Below is actual SKU pricing at standard 10 mm path length. Premium grades (Suprasil 300, Spectrosil 2000) command 2-3× the base quartz price due to lower OH content (<1 ppm vs 100-1500 ppm) and better deep-UV transmission below 220 nm. Glass equivalents cost 5-10× less.
| SKU Type | Material | Single | Matched Pair | Set of 10 |
|---|---|---|---|---|
| Standard 2-window | UV Quartz (HTR) | $30–$80 | $60–$160 | $280–$760 |
| Standard 2-window | Suprasil 300 (premium) | $80–$200 | $160–$400 | $760–$1,900 |
| 4-window fluorescence | UV Quartz | $45–$95 | $90–$190 | $420–$900 |
| Semi-micro (1.4 mL) | UV Quartz | $45–$110 | $90–$220 | $420–$1,050 |
| Micro (350 µL) | UV Quartz | $65–$130 | $130–$260 | $610–$1,235 |
| Sub-micro (50 µL) | UV Quartz | $95–$160 | $190–$320 | $890–$1,520 |
| Screw-cap closure | UV Quartz | $50–$150 | $100–$300 | $470–$1,425 |
| Flow cell (2-10 mm) | UV Quartz | $140–$380 | N/A | N/A |
| Standard 2-window | Borosilicate glass | $5–$30 | $10–$60 | $45–$280 |
| PMMA disposable | Polymer | $0.50–$1.50 | N/A | $5–$15 |
Bulk discount: 5% on orders >$3,000; 8% on orders >$5,000. POs accepted from universities and research labs worldwide.
Case Study: Pharma QC Lab Cuts Variance from 5% to 0.3%
Real Customer · Anonymized
Background
A regional pharmaceutical QC lab in the Netherlands was running daily API potency assays at 280 nm using budget glass cuvettes ($8 each). Their measurement variance averaged ±5% across triplicates — well above the ±1% USP <851> threshold for batch release. They were running 30-40 measurements per day with quarterly recalibration.
Diagnosis: Three Variance Sources
- Material: at 280 nm, glass cuvettes transmitted only 5% — meaning 95% of the absorbance reading was cuvette material noise, not analyte signal.
- Path length tolerance: budget cuvettes had ±0.05 mm path length variance (USP requires ±0.01 mm).
- Cleaning protocol: standard Hellmanex rinse was not removing protein residue between batches; baseline absorbance drifted 0.003-0.008 between runs.
Solution
Switched to UV-grade quartz matched pairs ($72 per pair, certified ±0.01 mm path length). Added 50% nitric acid soak between batches. Total upfront investment: $432 for 6 cuvette pairs.
Result (90 days post-switch)
| Variance (was ±5%) | USP <851> compliance (was 65%) | Cuvette lifetime (was 8 mo) | Saved per year |
| ±0.3% | 100% | 4.2 yrs | $48,000 |
“The cost difference was paid back in the first month from avoiding one re-run of a 200-vial batch. The next four years are pure ROI.” — QC Manager (verified, name anonymized at customer request).


